How to build, adapt, and deploy Miniblog
Recipe: Creating your own Miniblog website
Anyone with reasonable ASP.NET Core WebApp skills should have little difficulty in figuring out how to create their own personal blog site using Miniblog.core, but I hope the following recipe makes the task easier, quicker and more reproducible. It also has the advantage of lowering the technical bar so less skilled people can undertake the work. In fact this is just the sort of project from which a newbie will learn a lot about building and publishing websites using Microsoft technologies.
It should take you about 2 hours to build your blogsite from start to finish, but you may need more time if you have to read any tutorials to get up to speed.
- What you need
- Preparing your GitHub Repository
- Adapting Miniblog for your needs
- Creating Azure Resources for your website
- Publishing to Azure and Test
- Registering a Domain Name – Joker
- Setting a Custom Domain Name for your Azure WebApp
- Providing support for SSL
- Summary
- Related Posts
What you need
I used the free Community Edition of Visual Studio 2019 v16.7.6 running on a Windows 10 machine to create this recipe, though I expect most earlier or later versions of Visual Studio 2019 will work fine too. I also had a free GitHub account as well as a paid Azure Subscription with a S1 application plan.
Harish Rajora has produced a good tutorial about creating a GitHub account for the uninitiated and anyone new to Azure can get a free account with $200 credit which is enough to run a S1 application plan for 30 days. You can host your blog site on a free F1 plan, but you should be aware of the limitations as detailed in my Miniblog review post and pay attention to the notes for F1 plans given below.
In respect of Visual Studio, you will need to have the following installed:
- Workloads: Azure development as well as ASP.NET and web development – select during install, or use Settings, App & Features to modify the installation
- Tool: GitHub Extension for Visual Studio – available for free from Visual Studio Marketplace
- Library: .NET Core 3.1 SDK (or later) – download and run its installer
If you are entirely new to Visual Studio then run through some tutorials, or take a course like Kate Gregory’s Visual Studio 2019 Getting started. This will familiarise you with the tools you need to build your blogsite. Similarly if you’ve never built a ASP.NET Core WebApp before you might want to look at the Microsoft beginners tutorial before going any further, as this will help you understand the changes made by Miniblog.core to a standard baseline project.
Preparing your GitHub Repository
Your first step is creating a repository for your blogsite in order to keep your work safe. You have two options; taking the simple way, or adopting a slightly more complex approach which would allow you to retain a connection to miniblog.core. The advantage of keeping a connection is that it makes it much easier to keep your repo up to date with changes made to miniblog.core; new features, bug fixes, etc.
Simple Approach – remove connection to miniblog.core
The simple approach starts with you providing some initial content when creating your new repo on GitHub
- Open GitHub in your browser, login to your GityHub account, and then click the green ‘new’ button the top left of your home page. This opens the ‘Create a new repository’ form
- In the form provide a name for your repo (I called mine willstott.blog), select the option to keep it private, and select ‘Add a README file’ to provide an initial file.
- Click the ‘Create Repository’ button at the bottom of the form and wait for GitHub to create this new repo and open its root folder in your browser.
In your repo’s root folder you will find a README.md file along with a green ‘Code’ dropdown button. Use this button to clone the repo on your hard disk as follows:
- Click the ‘Code’ button and select ‘Open with Visual Studio’– this starts Visual Studio on your PC and opens its Team Explorer Connect window
- Use the Connect window to select the folder for your local repo in the Local Git Repository section – the folder must be empty so you will probably need to create a new folder; I called mine ‘willstott.blog’to match the name of my repo on GitHub.
- Click the ‘Clone’ button at the bottom of the section to create the local repo and populate it with the contents of your remote repo. It’s just the README file at this stage
Having created both a remote repo on GitHub and a corresponding local repo on your PC, you need to populate the local repo with the source files from the miniblog.core GitHub repo and then push them to your own remote repo on GitHub. This can be achieved as follows:
- Navigate to the miniblog.core project on GitHub
- Select ‘Download ZIP’ from the ‘Code’ dropdown button
- Save the ZIP file, and then extract its contents into the new folder you created on your hard disk – in my case ‘willstott.blog’.
- Use Team Explorer to add these files to your local repo (Changes window: Enter message and Commit All)
- Use Team Explorer to synchronise your local and remote repos (Sync window: Push outgoing commits).
- Check your GitHub repo now contains the miniblog.core files - see Figure 1

Figure 1: My GitHub repository
You are now ready to open the Miniblog.Core solution in Visual Studio and start the work of adapting it to fit your needs.
More Complex Approach – keep connection to miniblog.core
The more complex approach starts with you creating a new repo on GitHub without any content, so from the Create New Repository page:
- Open GitHub in your browser, login to your GityHub account, and then click the green ‘new’ button the top left of your home page. This opens the ‘Create a new repository’ form
- In the form provide a name for your repo (I called mine willstott.blog), select the option to keep it private, and clear the other selections so you don’t initialise your new repo with any files like README
- Click the ‘Create Repository’ button at the bottom of the form and wait for GitHub to create this new repo and open an instruction page in your browser
Instead of following the given instructions for setting-up a local repo, following these instead:
- Open a Command Prompt Window and change its current directory to a suitable location on your hard disk
- Make a directory (mkdir) for your blogsite project and set it as your current directory – in my case ‘cd willstott.blog’
- Execute the command: git clone https://github.com/madskristensen/Miniblog.Core.git
The Git command tools are installed as part of the GitHub extension for Visual Studio installation
You have now cloned the miniblog.core remote repo on GitHub to a local repo on your PC, but this isn’t exactly what you want as any attempt to push the commits made in your local repo will fail. This is because your local repo’s origin is set to the remote miniblog.core repo rather than your own GitHub repo; in my case willstott.blog. Therefore use the follow commands to change your local repo where XXX is the URL of the repo you have just created on GitHub, as shown in Figure 1:
- cd Miniblog.Core
- git remote rename origin upstream
- git remote add origin XXX
- git push origin master
The default name of your repo’s remote has now been changed to ‘upstream’ and a second remote called ‘origin’ has been added which points to your new repo on GitHub. Therefore your local repo now has two remotes: 1) upstream which maps to miniblog.core 2) origin which maps to your new repo – in my case ‘willstott.blog’. Consequently the last command pushes the commits in your local repo to your new repo rather than the miniblog repo. This is exactly what you want and if you check your repo on GitHub you will find it is now populated with all the files from miniblog.core, just like it was after completing the simpler option.
Unfortunately, one problem remains: if you start Visual Studio, open the Miniblog.Core Solution, and look at the Team Explorer’s Branch screen you can see that the master branch is tracking upstream, not origin. The following command fixes this issue as can be seen in Figure 2:
- git branch master --set-upstream-to origin/master
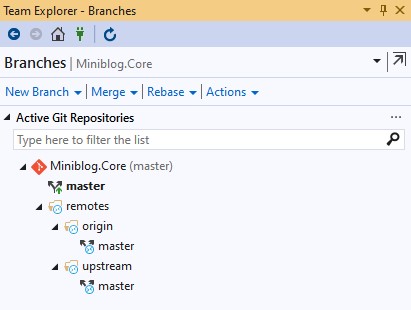
Figure 2: Team Explorer – Branch Window
You can now use Visual Studio to make changes to your blogsite project, use Team Explorer’s Change window to commit them to your local repo, and finally use its Sync window to push the commit to your remote repo on GitHub. The advantage of undertaking this extra work is that at any time you can update your repo with any changes made in the miniblog.core repo on GitHub just by issuing the command shown in Figure 3:
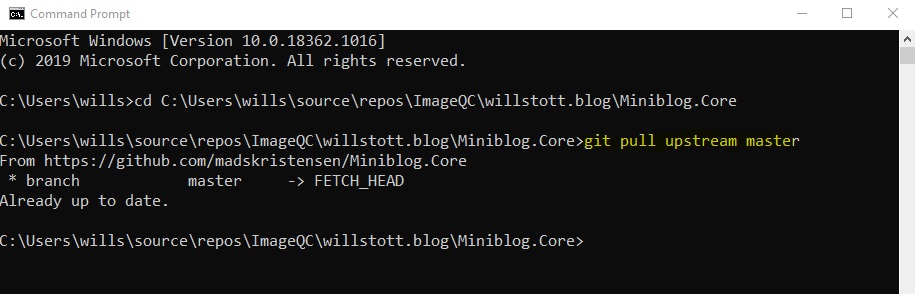
Figure 3: Git Command to update your repo with any changes made in miniblog.core
You are now ready to open the Miniblog.Core solution in Visual Studio and start the work of adapting it to fit your needs.
Adapting Miniblog for your needs
Perform an Initial Build
One of the golden rules of software development is to keep your program working. That’s to say, you start with a basic program, check it works, make a small change, check it works and then repeat. Therefore the first steps you want to take after setting-up your repo are:
- Open the solution in Visual Studio (File | Open | Project/Solution)
- Rebuild the solution (Build | Build Solution)
- Run the website from the IIS Express server on your PC (Debug | Start without debugging)
The solution should build without error and your browser should then open at your blogsite’s default page on localhost. You will want to repeat the above steps frequently as you develop your blogsite project. You are now ready to start adapting miniblog.core for your needs.
If you are using the Jet Brains ReSharper tool extension for Visual Studio you will find that numerous errors and warnings are reported during a build. Although these can be ignored, ideally you would want to fix them. I have proposed some work in this regard; see issue #148 in the miniblog.core GitHub project.
Smoke Testing your Blogsite
A Smoke test is a small subset of test cases that cover the most important functionality of your blogsite. For example, it might including checking that a list of posts appear on its home page, allowing you to login and then create and delete posts, and so forth. Typically I run my Smoke tests manually using a list of things that need to be checked in order to confirm that the build succeeded and created a working website that can be viewed in my browser; it’s a type of sanity test. I try to limit the time it takes to run such tests to five minutes. Afterwards I embark upon more thorough testing of the changes I’ve just made to the project.
Replacing the Standard Website Images
The miniblog.core website contains a number of images which are used for things like displaying an icon in the browser address bar (favicon). You will probably want to replace these with images that reflect your own branding:
- Replace the images in the src\wwwroot\img folder with your own equivalents, though you might want to keep avatar.svg as this provides the default image for comments made by people whose email address is not registered with a Gravatar.com
Update the WebApp’s Metadata - manifest.json
The miniblog.core WebApp stores certain metadata like the name of the website in the file manifest.json which can be found in the src\wwwroot folder. You should update the following elements:
- name: the name of the website as displayed at the top right of each page
- short_name: the name applied to desktop icons, etc
- description: the text that describes your website to Google indexing bots, etc
Update the WebApp’s Configuration Settings – appsettings.json
ASP.Net Core WebApps typically store their configuration settings in a file called appsettings.json which can be found in the src folder; see Figure 4. You should update the following elements:
- forcessl false: keep this value as ‘false’, though you will want to set force sll to true after updating your webapp to support Secure Sockets Layer (SSL) as described later.
- user: username: enter the name you want as a username during your website’s log-in
- user: password: enter the value of the hash generated from the form at https://onlinehasher.azurewebsites.net/ for your given password and salt character string. It is practically impossible to recover the password text from this hash value.
- user: salt: enter the random character string you used as the ‘salt’ value when generating your password hash. I used a random password generator to provide this value.
- blog: owner: enter your name as the owner of the site
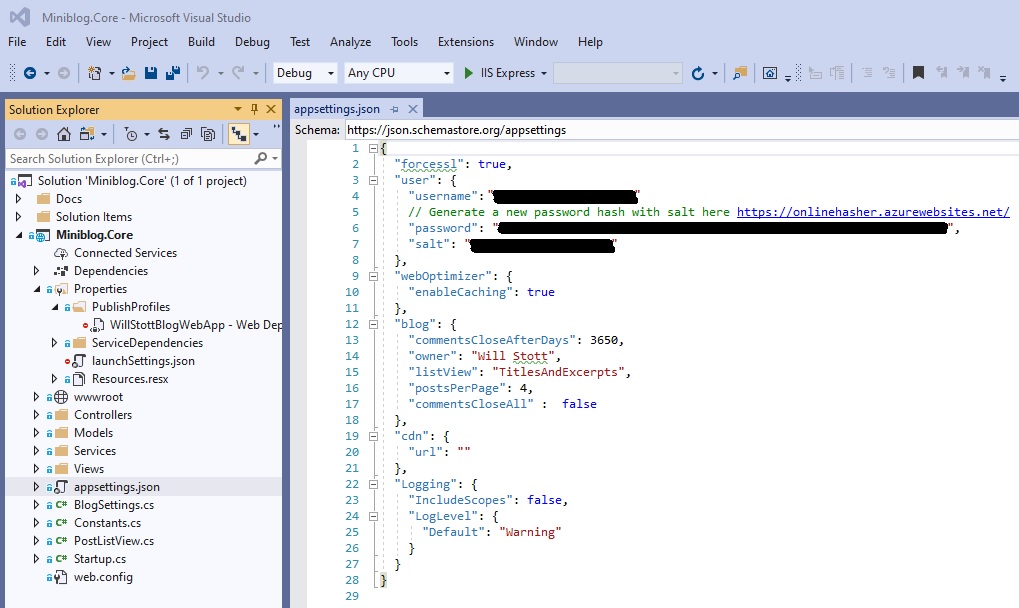
Figure 4: Editing appsettings.json
Update the Configuration Settings Class - blogsettings.cs
The class BlogSettings is contained in the file BlogSetting.cs which can be found in the src folder. An instance of this class is created during your WebApp’s start-up and initialised from appsettings.json. The BlogSettings class defines default values for any values not found in your appsettings.json file, so it is good practice to make sure these defaults match the values defined in the file, specifically the default value for Owner (your name)
Update your Project Properties and Test
It is good practice to update the package details in your Project Properties (Figure 5) as these values are copied into the miniblog.core.dll generated by the build process and can help you identify it. I find the package version particularly useful in terms of identification as typically I update it before submitting changes that I have published. I also create a version control tag with a matching name as explained at the end of this post. In this way I can always rollback my source file to correspond with any published version of my site.
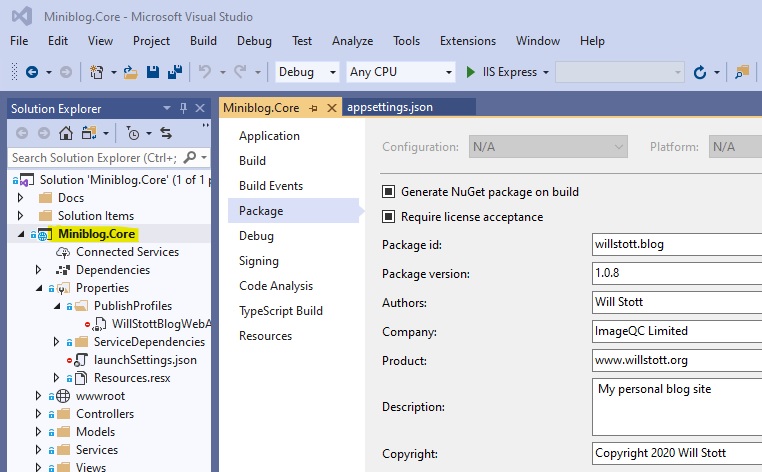
Figure 5: Project Properties - Package Section
You are now ready to build your project and check your changes produce the desired effect as follows.
- Rebuild your project (Build | Rebuild miniblog.core)
- Run the website from the IIS Express server on your PC (Debug | Start without debugging)
- Perform a Smoke test on the website now displayed in your browser
After ensuring that your website is running correctly from IIS Express you should start creating the resources you will need to run it on Azure
Creating Azure Resources for your website
Once you have created an Azure account and subscription you can create the resources you need for your website using the Azure Portal. Most beginners use the portal’s GUI to create a resource group and service plan as well as the WebApp. However, I find it easier to use the Azure CLI which you can operate from the Portal’s Cloud Shell. Not only is this faster, but it also allows me to put all the commands needed to recreate the resources for my project into a text file which I can put under version control. The Cloud Shell is opened by clicking the button next to the search bar in your browser; see Figure 6
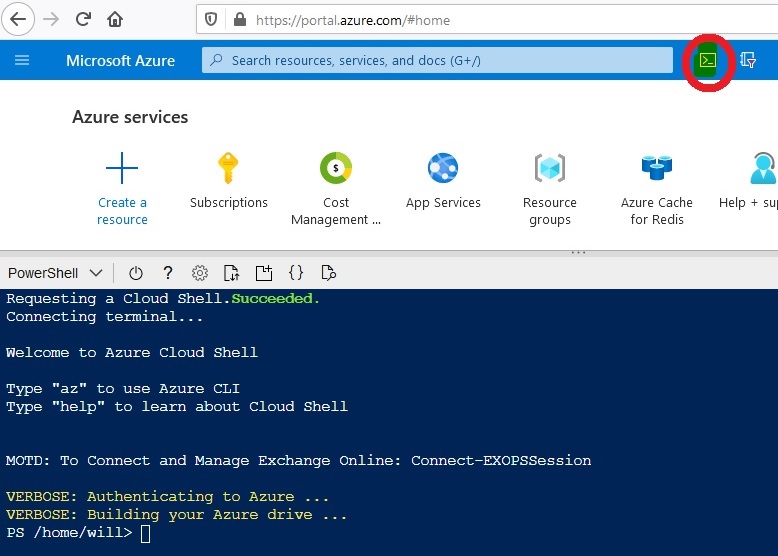
Figure 6: Azure Command Shell
Note: You may have to create a storage account to support the drive needed by the Azure Cloud Shell, but this happens without the need for much intervention on your part.
Having opened a Cloud Shell you should select PowerShell (rather than Bash) in its menu bar and then issue the Azure CLI commands listed below. These commands are fully documented in Microsoft Docs, but you should be aware:
- Your App Service Plan and WebApp must be in the same resource group
- You need a S1 service plan to support a custom domain and SSL. This level service plan costs me approx $80 per month. You can use the free F1 plan, but it also has other limitations as detailed in my Miniblog Review post
- You should set the location of your service plan to somewhere close to where you expect most of your readers to come from. I selected “WestEurope”, but Microsoft publishes a list of other locations
The labels in Table 1 are used when giving CLI commands in this post.
| Label | Description | Set at... |
| AAAA | Name of your subscription returned by az account list | step 28 |
| BBBB | Name of your resource group | step 30 |
| CCCC | Name of your service plan | step 31 |
| DDDD | Name of your webapp | step 32 |
| EEEE | Your username; see appsettings.json | step 33 |
| FFFF | Hash of your password; see appsettings.json | step 34 |
| GGGG | Salt used to generate the hash; see appsettings.json | step 35 |
| HHHH | Your custom domain name – mine is www.willstott.org | step 46 |
| JJJJ | Thumbprint returned after creating a SSL certificate | step 53 |
Table 1: Labels used in Azure CLI Commands
Commands to create a WebApp
The following commands create a WebApp - see Table 1 for the label definitions
- az account list
- az account set --subscription AAAA
- az group create --name BBBB --location "WestEurope"
- az appservice plan create --name CCCC --resource-group BBBB --location "WestEurope" --sku S1
- az webapp create –name DDDD --plan CCCC --resource-group BBBB
At this point it is good idea to add the configuration settings for your WebApp. Such settings take precedence over those given in appsettings.json and have the advantage that they can be updated without the need to republish your project from Visual Studio. I recommend you at least add the following as well as issuing the restart command as such settings are only picked-up during the WebApp start-up process:
- az webapp config appsettings set –name DDDD --resource-group BBBB --settings 'user:username=EEEE'
- az webapp config appsettings set –name DDDD --resource-group BBBB --settings 'user:password=FFFF'
- az webapp config appsettings set –name DDDD --resource-group BBBB --settings 'user:salt=GGGG'
- az webapp restart –name DDDD --resource-group BBBB
You might want to return to your Azure Portal’s home page and take a look at the recent resources to confirm that your resource group, service plan and WebApp are now present and then inspect your WebApp’s Overview blade to check that its App Service Plan is set to S1 and its settings in the Configuration section are present as expected; see Figure 7.
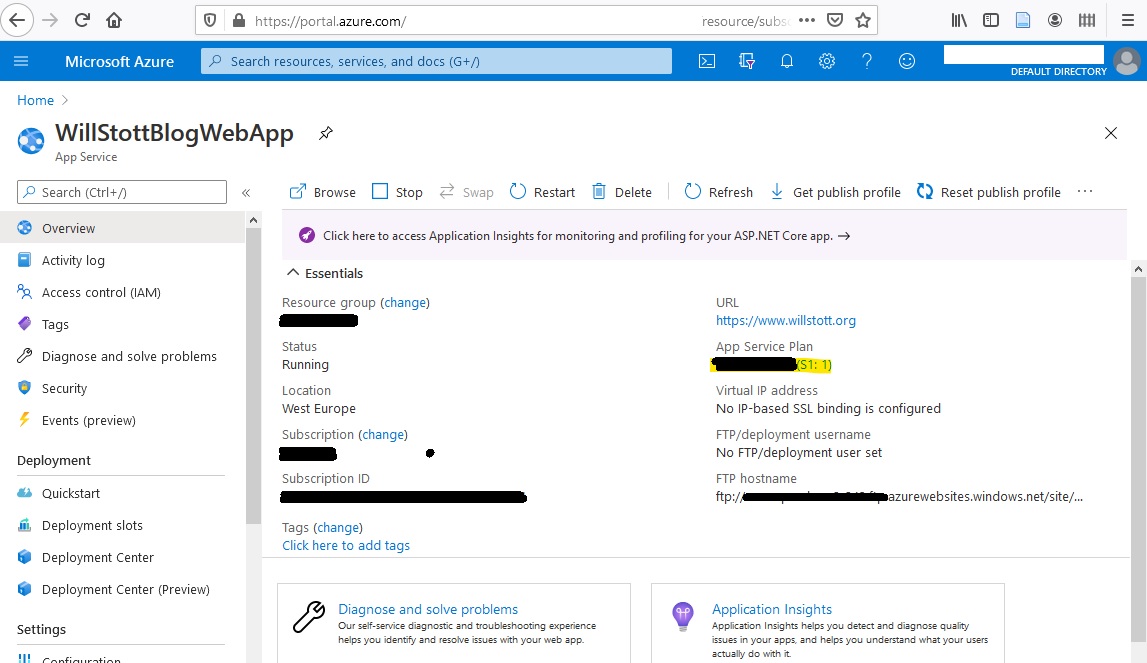
Figure 7: Azure WebApp Overview page
You are now ready to Publish your website project from Visual Studio to the WebApp you have just setup on Azure.
Publishing to Azure and Test
Create a Publishing Profile
Visual Studio makes it very easy to publish a website project to Azure. First you need to create a publishing profile as follows:
- Open the Solution Explorer window, right click the name of the project (Miniblog.core) and select Publish from its context menu
- Select Azure as the target for publication
- Select Azure App Service (Windows) as the type of service
- Apply the settings necessary to find your WebApp in the given subscription and resource group, select it, and then click ‘Finish’
After creating your publishing profile you are presented with the Miniblog.core Publish window (see figure 8). The same window will appear in future whenever you select Publish from your project’s context menu. Besides allowing you to publish your project, it also allows you to alter your existing publishing profile or create a new one. However, before clicking the Publish button there is one final step to take – excluding your Posts folder.
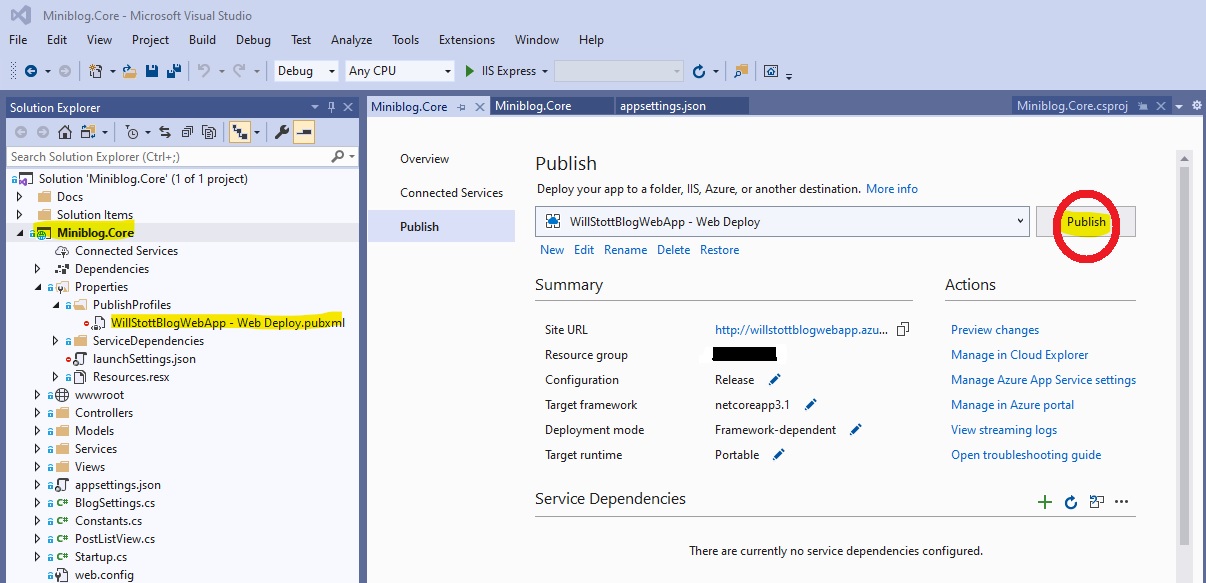
Figure 8: Visual Studio Publish Window
Your publishing profile has small stop sign icon next to it. This shows that the file will not be added to version control; a sensible option given that it may contain certain information that would not want to share with others.
Editing the Publishing Profile to Exclude the Posts folder
You will probably have created a number of posts during the Smoke testing of your project. These Posts appear as XML files in the folder wwwroot\Posts. Clearly you do not want to publish these files when your site is hosted on Azure, so you want to exclude the contents of the Posts folder from the file and folders that will be uploaded to your Azure WebApp. This is done as follows:
- Use Solution Explorer to open the Miniblog.core project’s Properties folder and then open the PublishProfiles folder as shown in Figure 8.
- Open the Publishing Profile file (*.pubxml) previously created in Visual Studio’s editor – just double-click the file in Solution Explorer
- At the end of the file add the <ItemGroup> show below. This should be inserted just after the last </PropertyGroup> and before the final </Project>
<ItemGroup>
  < MsDeploySkipRules Include="CustomSkipFolder">
    < ObjectName>dirPath</ObjectName>
    < AbsolutePath>wwwroot\\Posts</AbsolutePath>
  </MsDeploySkipRules>
< /ItemGroup>
The way you exclude files and folders from may change with different versions of Visual Studio. The above instructions work with Visual Studio 2019.
Publishing your Project on Azure
Having completed the preparation of your Publishing Profile you are now ready to publish your project to Azure. This step involves rebuilding your project to create the necessary code files, uploading them together with the files in the wwwroot folder (excluding the Posts subfolder) to your WebApp, and finally opening your browser at the URL of your Azure website. Fortunately, you just need to click one button to do all this work:
- Click the Publish button in the Publish Window – see Figure 8
- Run your Smoke test to check that your blogsite is working properly
You can find the code files and other build products in the folder Miniblog.Core\src\bin\Release\netcoreapp3.1. There is another folder called Debug which contains the build products for a Debug Build.
You now have a working website that anyone connected to the internet can view. However, the URL isn’t very expressive as it’s the name of your Azure WebApp followed by the standard Azure domain azurewebsites.net. If you can afford to host on the S1 service plan you will want to change it to something more appropriate, but first you need to register a domain name for your blogsite.
Registering a Domain Name – Joker
The internet’s Domain Name System (DNS) is responsible for converting the URL you type into a browser into the Internet Protocol (IP) address of the server responsible for hosting your WebApp so that a connection can be made between the two machines. This connection will then be used to send the contents of your website back to the browser. The DNS is made-up of many, many servers running world-wide that distribute the work of translating URLs like like www.willstott.org into IP addresses like 168.56.7.245.
The question you might now be asking is, how do I add my own record into the DNS so I can get my domain name translated into the IP address of the Azure server running my WebApp? The first step is registering a domain name:
- Register your domain name HHHH with one of the many registrars. I use Joker.com, but there are many alternatives like GoDaddy.com and Wix.com.
Each of the registrars have their own way of registering a domain name and there is also quite a wide variation in cost; I pay about $7.00 a year for a .org name. However, the process is no more difficult than using a credit card to buy anything else from the internet. Once you have purchased a domain name your registrar will manage the task of getting it added to one of their DNS servers so the associated records can be distributed to all the other servers on the internet. Your registrar will usually present you with a web portal so you can administer the these records. For example, the portal provided by Joker.com allows you to create a CNAME record as follows:
- Login to your account on Joker.com and find your domain name HHHH in the list displayed on the home page; mine is willstott.org
- Click the ‘DNS’ text in the row containing HHHH to open the DNS Configuration page. This page will list your existing DNS records for the domain.
- Click the ‘Add New Record’ button to display the form shown in Figure 9. This allows you to define the type of record (CNAME), its subdomain (www) and the name of the alias (DDDD.azurewebsites.net). You then click ‘Add’, leaving the existing default values in the ‘Options’ section
- Click the ‘Add New Record’ again, but this time create a TXT record and keeping the subdomain as www, enter the Custom Domain Verification ID code as its content. You obtain this ID from your Azure Portal – Custom Domains as shown in Figure 10. You then need to click ‘Add’ as before.
- Click the ‘Save Changes’ button at the bottom of the page to apply your new DNS records. It may take a few hours for them to propagate to your nearest DNS servers and up to 72 hours for them to propagate to all servers worldwide.
There are a number of different types of DNS records you can create to map your domain name to the IP address of your Azure WebApp, but I prefer to use a CNAME record as it creates an alias for the WebApp name rather than setting a given IP address. In this way you are isolated from any changes in the IP address allocated to your WebApp by Azure.

Figure 9: Joker.com add CNAME record
Once your CNAME record has been added to the DNS you can proceed to the next step: setting a custom domain name for your Azure WebApp
Setting a Custom Domain Name for your Azure WebApp
The following step requires you to have a App Service Plan of D1 or greater
To complete the process of setting-up a custom domain name for your blogsite you need to make your Azure WebApp aware of the hostname - HHHH. This can be done using the Azure CLI / Cloud Shell as follows - see Table 1 for the label definitions
- az webapp config hostname add --webapp-name DDDD --resource-group BBBB --hostname DDDD
You should then check that the Custom domain blade shows the assigned custom domain like that shown in Figure 10. You will note that the domain name is marked as ‘Not secure’ because you have not bound a SSL certificate to it. This is something you will do next.
Your WebApp’s Custom domains blade contains the Custom Domain Verification ID. You should use this ID value to create a TXT record for your custom domain’s DNS settings as described in the previous section. This TXT record provides proof that you own the domain, or at least have the permissions necessary to create its DNS records.
Providing support for SSL
The following steps require you to have a App Service Plan of S1 or greater
Most websites now support Secure Sockets Layer (SSL) connections because modern browsers warn people against visiting sites that have not implemented this level of security. In the past I bought the SSL certificate necessary to implement SSL connection for my websites from the likes of Thawte and GoDaddy. This proved to be not only an expensive exercise at $200 per year, but also one that involved a heavy administration burden in terms of undergoing verification of my company’s good standing and following a tortuous process for obtaining the certificate and uploading it to Azure. Fortunately, you can now obtain SSL certificates at no cost from Microsoft and then apply it to your website using the following Azure CLI commands - see Table 1 for the label definitions:
- az webapp config ssl create --resource-group BBBB –name DDDD –hostname HHHH
- az webapp config ssl bind --certificate-thumbprint JJJJ –name DDDD --resource-group BBBB --ssl-type SNI
- az webapp update --resource-group BBBB –name DDDD --set HttpsOnly=true
The certificate thumbprint JJJJ is displayed after you create the certificate in step 53
You should confirm that your domain name is now secure by revisiting the Custom Domain Blade for your WebApp in the Azure Portal. It should now be marked as secureas shown in Figure 10.
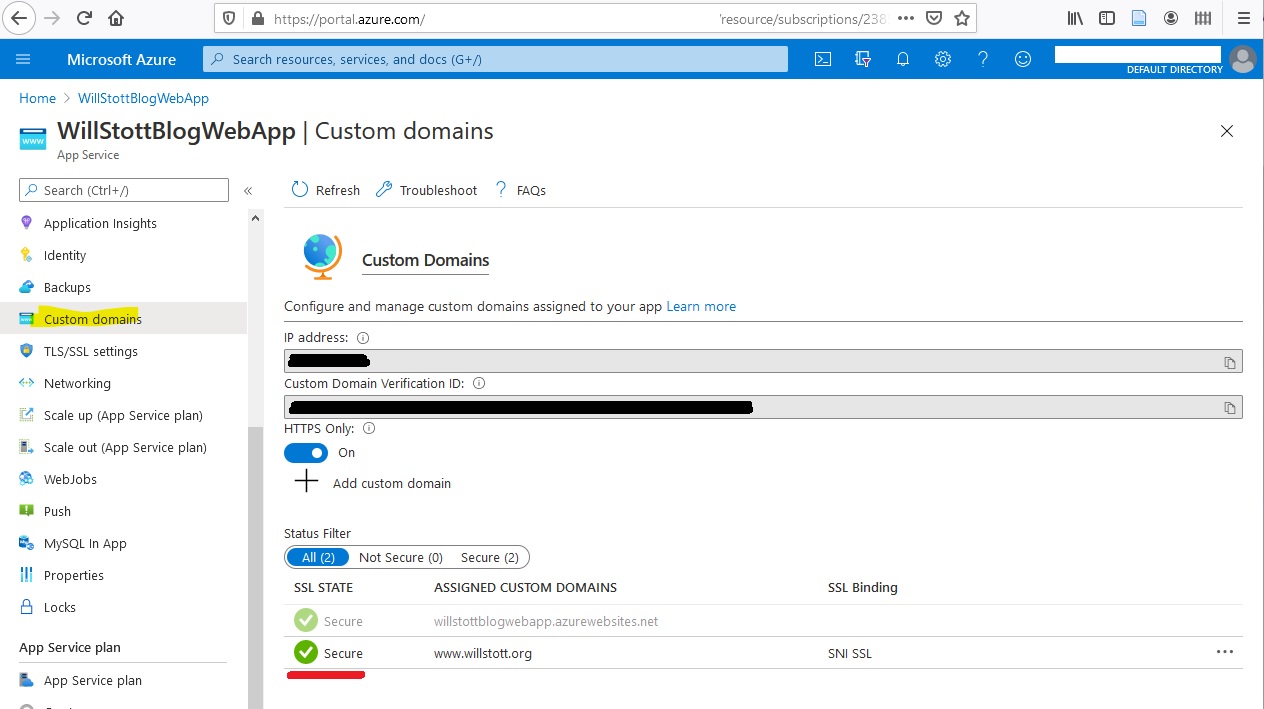
Figure 10: Azure WebApp Custom domains with Verification ID
The only remaining task is changing your application settings so that it forces the use of SSL:
- Use Visual Studio to edit your project’s AppSettings.json file and set forcessl: true.
You now need to republish your project using the same procedure as before:
- Open the Solution Explorer window, right click the name of the project (Miniblog.core) and select Publish from its context menu
- Click the Publish button in the Publish Window – see Figure 8 and wait for the website to open in your browser
- Run your Smoke test to check that your blogsite is working properly, paying particular attention to applying your new domain name prefixed with the https:// protocol
If you enter the non-SSL protocol (http://) with your domain name into a browser’s address bar, you will see that the URL is automatically changed to the SSL protocol; in my case to https://www.willstott.org. You will also notice that a padlock icon appears in the address bar to indicate that you have a secure SSL connection to the Azure server – clicking this padlock opens a dialog which allows you to view information about your certificate; see Figure 11.
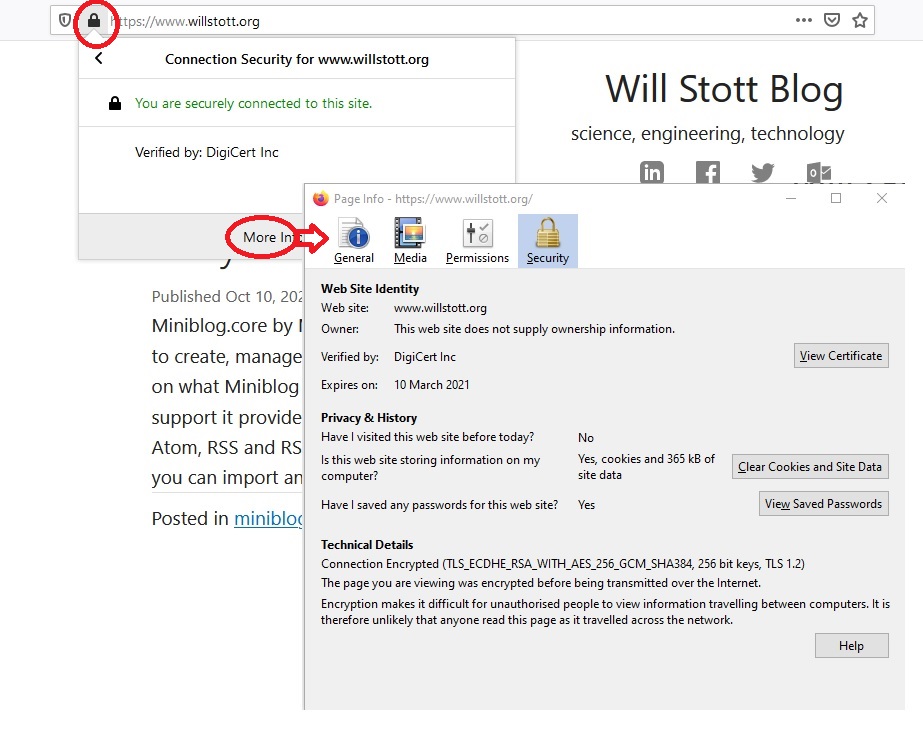
Figure 11: SSL Certificate displayed in a browser
Submitting Changes to your Project Files
To complete the process of adapting miniblog.core to provide your own blogsite you should add the files you have changed to version control as follows:
- Open the Team Explorer window and click the ‘home’ icon in its menu bar to display the location of your remote repo and a list of the actions you can apply; Changes, Sync, Tags, etc
- Click the ‘changes’ action button to open a form and enter a description of the work you have done into its message box; see Figure 12.
- Click ‘commit all’ to update your local repo – a message will appear containing your commit ID
- Click the ‘home’ icon again to return back to the list of actions
- Click the ‘Sync’ action button and check that there is an outgoing commit waiting to be pushed to the remote repo in GitHub
- Click ‘push’ and wait for your changes to be sent to the remote repo
- Click the ‘home’ icon to return back to the list of actions
- Click the ‘Tags’ action button and then click ‘New Tag’ to open a form into which you should enter the ‘v1.0.0’ as the tag name – i.e. the version number in your Project Properties (see Figure 5). You should then add a suitable tag message, click the ‘Create Tag button, and finally click ‘Push All’ to update your remote repo on GitHub with this new tag information
- Use Solution Explorer to open your Project Properties and increment the version number in the Packages section to mark the start of future changes to your project.

Figure 12: Visual Studio Team Explorer – Changes Window
Summary
You have now created your own blogsite from miniblog.core and published it to Azure so it can be accessed using a custom domain and the SSL protocol like https://www.willstott.org. My next blog will explain how you can enhance this project to provide additional features that makes your blogsite appear slightly smarter.
Related Posts
You might find the following posts interesting:
If you found this post useful please help raise my profile by providing a link on your social media account; just click the buttons below. You can also add a comment or contact me by email, but I can’t promise to respond immediately.
Comments
Greetings, excellent post, I have just extended the implementation of database services with entity framework, I hope we can be in contact and make this project grow
Luis AlexanderHi Luis, Glad you liked my post. I've just sent you an email so look forward to hearing from you.
WillHey, I have also used the miniblog.core but modified it quite a bit, would be cool to start a fork with changes that won’t be accepted on master, such as the search I have added on https://www.mvc.tech
Joshua holdenHey Joshua, I really like your search feature. It's certainly something that I would like to add to my site. I'm trying to find a bit of time to work on the next version. Let's keep in touch.
WillVergy gret article. How can i get all of your enhancements ?
SamuelThanks for the recipe and as a newbie web developer I have to say it made me learn some crucial things! What would it take to extend Miniblog.Core into a no-code web tool like blogger? A post on that would be very helpful.
SushantThanks for an excellent information
Satcom InfotechThank you for the appropriate information
The Lawyer For Divorceexcellent information
advocatepremthis article is very useful for the our website
Regency Plythank you for sharing such information
Lawyer in Mumbaithank you for sharing such information
dfsddfs[authoritydietproducts]( <a href=" https://www.authoritydietproducts.com/" >authoritydietproducts.com – Your #1 Source for Fitness</a> )
Trusted Resource<a href=" https://www.findbodyinshape.net/ ">FindBodyInShape – Effective Health & Fitness Strategies</a>
Fitness Strategies